How to… create Parameters in Prep
For anyone who has been taught Tableau Desktop by me, they’ll know how much I love Parameters and the functionality they can offer the audience of your analysis. When Parameters were announced in Prep, I was excited to see whether they could have as much impact in data preparation as they have in visualisation. In this post, we will explore what parameters are and how you can make use of them to make you data preparation more effective.
What is a parameter?
A parameter in Tableau is a ‘user generated value’. This means the parameters can be completely separate from the data source you are using and this gives you a lot of flexibility of what you can create using them.
If you want to create a value that will apply a multiplication factor then you can generate a numeric parameter. If you want to pick which measure you want to assess then you could use a string to add that value into a filter within your flow.
As a quick recap, there are four steps in Tableau Desktop to using parameters:
Create a parameter
Show the parameter control (this is what you or your user will see when then want to change the value)
Use the parameter in a calculation
Use that calculation in your view
The steps for using a parameter in Prep are slightly different because of how you and your user will interact with the parameter options.
How to create a parameter in Prep?
Creating a parameter in Prep is easy once you know where to look for the ‘Create Parameter’ icon. At the top of the flow pane, the ‘parameters’ control icon sits after the ‘run’ icon.

Once you click on this icon, you will presented with the option to ‘Create a Parameter’ with a description of what a parameter offers you.

The next dialogue box that appears on your screen will let you enter all the details required to setup your parameter.

Clearly naming your parameter is important. You will be entering the parameter name into calculations and filters so naming the parameter something clear will help you and anyone else who wants to use the flow in the future. Adding a description will also help others who use the workflow in the future.
As at the time of writing this you currently have the option of setting your parameter as a:
Whole Number
Decimal Number
String
Boolean (True / False)
Once you have selected what data type you want your parameter to be, you can then select what the allowable values could be. By selecting a set list, you might be restricting your users choices on what they could choose as the value the parameter is using but it also may prevent mistyping mistakes.
Here I have set up my parameter to let the user of the workflow select what score in a subject a student would need to achieve to pass a subject. The parameter is just holding the value at the moment as you will need to use the parameter somewhere within your flow to allow it to affect your flow at all.

Prompt for the Value
The most important part of the parameter in Prep for me is the tick box with the blue glow around it on the image above — Prompt for value at run time. This option allows the user of the workflow, whether on Prep Builder or Prep Conductor, to enter a value for the flow before running the workflow. When the user runs the flow on Prep Builder in the Output step, the following dialogue box is shown.

You can select any value if the ‘All’ option is selected when creating the parameter or the user is shown the options created if the ‘List’ value is chosen.
Using a parameter
The use cases for parameters will develop over time but there are two main ways you are likely to use them now.
Calculated Fields
Firstly, the main way you will use a parameter is in a calculated field. The parameter can all the user of the flow to adapt the flow to their specific needs. In this calculation, the user can set the score they determine would be needed to achieve a passing grade. If you have ever used parameters in calculations in Tableau Desktop, the same logic can be used in Prep in a similar way. Parameters can be entered in the calculation editor and when they are named correctly, they appear in purple text.
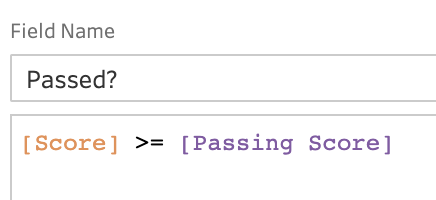
A parameter is not like a normal field in your dataset as it is one constant value that you have selected. Parameters do nothing until they are linked into the data through a calculation or used within the flow. In the example above, the value in each row of the Score field will be compared to the parameter value at the time the flow is run.

A nice touch in Prep is any calculations which references the parameter will show in the Changes Pane as per the image above.
Output Names
The second main place you could use a parameter is in the Output Files name or location. When working in an Output Step, you will be able to add the Parameter Value into the file name or location by clicking on the parameter icon at the end of the name or location section.

This is particularly useful as you might not output the parameter in the dataset as a separate field. This would make tracing back the parameter used to form the data set very difficult indeed. By placing the parameter value in the name of the file, understanding the logic that has formed it would be much easier.
Adding a parameter to the name of the file will also allow you to output multiple files using different parameter values but save them to the same location. This is a common request I have come across so is a really useful addition.
When running the flow with the parameter added to the file name, you will see the parameter name, shown in purple again, inserted within the name of the file. You can add the parameter name anywhere within the name and not just at the end.

The output will run as normal for Prep and you can see the parameter value, in this case 90, has been added to the end of the file name.

Summary
Parameters are a feature that has been requested since Prep was a glint in the developers eyes. Parameters are going to offer a lot of flexibility to end users of flows to bespoke the data sets more to their own needs. This is especially important when:
Trying to make data simpler for end users to make use of
Filtering large data sets down to more manageable and relevant chunks
Parameters will be a fundamental part of how Prep is used in the future so I’m looking forward to see the different use causes to be found by various users across the world.